Showing posts with label gift giving. Show all posts

Wednesday, October 7, 2015

TRICK OR TREAT!

Hello!

I love Halloween.  I love decorating my home with spooky finds, I love taking a drive with Superman around our town to see how others decorate their front yards, and I love watching Hocus Pocus every Halloween night while eating donuts and sipping apple cider.

Last week was Stamp Club and my ladies loved our project:


I used the spider web image from the Witches' Night Stamp Set to clear emboss a spooky element on to the sentiment die cut.  I think it turned out so good! That was the only stamping on this project. To make the sentiment stand out, I mounted it on a vellum banner that was cut with the thinlits die included in the set.

Here's one more look.  To add one extra pop of color we punched stars out of the Rich Razzleberry card stock and adhered them to the ends of some fabulous Metallic Gold Baker's Twine.  Then, because every treat bag needs a treat, we stuck in a yummy peanut butter pumpkin and we have something fun and festive to give away!


The best part of the night for me was when most of my ladies said to me "Stop creating such cute projects for us to make!" They had all come with their pre-planned lists of what they were going to buy then changed their minds because they HAD to order all the supplies we used so they could make more Halloween treat bags at home!  A job well done, I say. ;)

I hope I've inspired you to make some fun Halloween treats to give away this year.

Thanks for joining me at The Table today!


Thursday, October 31, 2013

Pocket Card Tags

Hello and Happy Halloweeeeen!!!

Just a quick pop in on this fabulously frightful holiday to show you what I did for my husband and boys today.


Playing again with the Gift Bag Board Punch from We R Memory Keepers.  I love that thing!  Again, I'm using the fun Bewitched collection.  I filled the bags with their favorite candy. :)

I needed some quick tags to attach to their treat bags so I went through my stash of Albums Made Easy pocket cards.  They are adorable as is, but I wanted to dress them up a bit so I pulled some of the fun stickers from the sticker sheet and popped them up on foam adhesive.  TIP: When embellishing pre-made elements, foam tape is an easy but essential thing to use.  It makes a huge difference!

I took a black pen to make a little web/trail line for my cute and spooky spider.

Look at that fun dimension on the embossed stickers!

This talk bubble card is a great background for the "Trick or Treat" sentiment.

Now when my boys come home from work and school, they'll find a cute and spooky treat on their pillow from their favorite ghoul!

Thanks for joining me at the Table today!


Saturday, October 19, 2013

Sad Day...

Hello!

Well....we've hit a milestone at our house, people.  And I gotta say, I'm kinda sad about it.  This is the first year in, like, forever that none of my kids will be trick-or-treating.  Yep.  My youngest, is now of the age where he gets to hand out the candy instead of begging for candy.  And it hurts my heart a little.

I love that my kids are growing up and becoming responsible (most days) citizens, but there are days that I sure do miss those little kids running up and hugging my legs or crawling on my lap on the couch to cuddle with me (although, my 17-year-old actually did crawl on my lap last week and cuddled with me for a few minutes.  Shhh.  Don't tell him I told.  I'm sure it was quite the site, but I loved it!)

So since there won't be pillowcases full of sugary, Halloween goodness this year, I decided to do something sweet and crafty for all my kids.

I used my Gift Bag Punch Board from We R Memory Keepers and made these cute little bags with the Bewitched collection for my oldest son and his wife:


I layered the tag shapes with the journaling card shapes.  This gives the finished tags a little more dimension and interest.  My other two boys will be getting bags similar to this also filled with their favorite Halloween candy, thus carrying on the tradition of my mom and mother-in-law. :)

Supplies used:

Paper:             Bewitched (We R Memory Keepers)
Tools:             Gift Bag Punch Board (We R Memory Keepers)
Other:             Black Velvet Ribbon (We R Memory Keepers)
                        Orange ribbon (Stampin’ Up!)
                        Black/White twine (We R Memory Keepers)
                        Black eyelets (We R Memory Keepers)


Thanks for joining me at the Table today!


Monday, February 25, 2013

Hostess Gift

Hello!

I thought I'd take my mind off our freezing outside temps and my nagging sore throat by sharing with you what my Stamp Club hostesses get this year.

I've been a Stampin' Up! demonstrator for about 3 years now and although, I'm not a career-minded demonstrator, I've been adjusting a few things here and there as my SU! business has puttered along.  This year, I decided to do themes and hostess gifts (if you were in my Stamp Club last year, so sorry I didn't treat you as well as the ladies this year. :( come back next year and I'll make it up to you!)

Because my schedule is a little hectic right now, I hold Stamp Club every other month.  Last month the theme was Clean, Simple, but Cute! (see post here for the projects we made).

Here is what all the ladies will be getting as a hostess gift this year:


I made a little card holder box from the scallop envelope die.  You just put two together and they hold 3x3 cards and envelopes perfectly.  I included 3 cards and 3 envelopes.  They fit snugly without being squished.  The flower and the kraft colored tag are from the Pop-Up Posies kit.  The Calypso Coral looks super neon in these photos.  Sorry about that.  It's not.  Just a nice pretty pinkish-orange.  So each lady in my Stamp Club will get one of these sets.  The design will look the same but I'll probably change out the colors each time.

Thanks for joining me at the Table today!


Wednesday, February 20, 2013

Pinterest Party....A Wedding Gift

Hello!

I have a good friend getting married this week.  She and her husband-to-be are a little more established in life so they don't need a lot in the way of home goods and for her shower I didn't want to get her a gift card.  So I decided to make her something she can display in her new home.  My initial intent was to do something like this from one of my Pinterest Boards:


But then I decided I wanted a more home-themed quote and a bit more color so I ended up with this:


They're a really cute couple and I'm so happy for them.  I made the banners for their reception.  I'll take photos when we go and show you how they turned out.

Thanks for joining me at the Table today!


Monday, December 10, 2012

Use Your Scrapbooking supplies for Packaging!

Hello!

Can you believe we're in the double digits of December already?!

You probably have at least started your Christmas shopping.  And if you haven't, get going!  Once you bring those special, well thought out gifts home, you want to wrap them up in pretty packing, right?

I created some fun and festive packaging using your paper crafting supplies.

On this first package, I took some brown wrapping paper I got at Target and stamped the snowflakes from We R's Yuletide line in Stampin' Up! Soft Suede ink.  Then I wrapped the box and brushed the ink around the edges of the box.

Next I took papers from the Storytime, Red, White & Blue, and Yuletide collections (All We R Memory Keepers), cut them into banner shapes and sponged them with the same brown ink.  After I glued everything to the package, I tied it with some We R baker's twine.


And a close-up of the tag.  I used one of the embossed stickers from the Yuletide line and stamped another snowflake from the stamp set.  We R stamps are really high quality.  I always get great images from them.  They aren't going to make them anymore, so if you want to get your hands on some of their stamps, hurry!

Next, I wrapped this package with plain white paper.  Then I placed a border sticker smack dab in the middle.  I love that it fit perfectly across.  Then I took an embossed wreath tag from the Yuletide collection and adhered that to the middle of the package.  To embellish it even further, I made an accordion flower out of some of the Yuletide paper and used one of the embossed chipboard tag stickers.  You can't really tell, but it's embossed with silver foil.  So pretty!  I, again, used baker's twine to put it all together.


And a close-up of this tag.


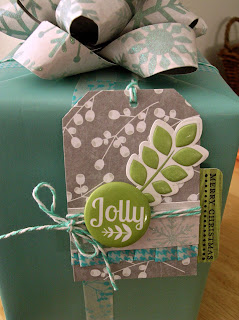
Last, but not least, is the blue package.  I started with some plain blue paper, then embellished the box with some coordinating washi tape and baker's twine.  The tag was made from a scrap of Winter Frost patterned paper.  I love the gray with the white berries.  I used my Angle Corner Chomper (from We R) to turn it into a tag shape.  Then I added We R washi tape, patterned paper, baker's twine, and a sticker and mini badge from the Yuletide line.  To finish the tag, I punched a tab with my Tab maker punch and the green woodgrain paper from the Yuletide line.  And stamped a sentiment from Stampin' Up Teeny Tiny wishes.


But the thing I'm most excited about this package is the handmade bow.  I took strips of double sided patterned paper from the Winter Frost line (this particular paper has glittered snowflakes on one side.  I love).  Then I looped and stapled them and adhered them all together.  Here's the tutorial I used, if you'd like to make your own.   This was my first attempt and I wasn't disappointed.  It was actually really fun.  The tutorial uses magazine paper, and that would probably be a little easier to manipulate but using the thicker patterned paper worked well, just the same.  Super easy and really cute when you can customize them with patterned paper of your choice!


 I hope that gave you some inspiration to make your packaging as special as the gift inside. :)

Thanks for joining me at the Table today!

Monday, December 3, 2012

I'm Back....and boy do I have a lot to say!

Hello!

Welcome to the month of Christmas!

The older I get, the more lazy relaxed I get about the Holiday goings on.  I love to think each year will be the year that I have the magazine Christmas tree.  Usually it doesn't happen and I'm totally fine with it.  But each year (after Christmas) I get a few more ornaments in the style and color I'm going for so one year I'll get there.  And I'm sure I won't be any happier than I am already.  It doesn't have to be perfect.  We also drink lots of hot cocoa during December.  I'm drinking some right now, as a matter of fact.  With a dash of cinnamon.  Yum!  Cocoa makes everything better.  Especially when topped with whipped cream, yes?

Yes, Christmas is pretty special at our house.  I may have told you this before, but one year, Superman and the kids secretly put up and decorated the Christmas tree BEFORE Halloween!  Yeah.  I wasn't very happy about that one.  I like each holiday to have it's own celebration, people!  So it really ticks me off when Thanksgiving pretty much gets the brush-off in the retail world.  I mean like REALLY.

So anyway, now that Thanksgiving is over, I can say that I'm ready to get the Christmas season underway!

How about a simple, yet cute, neighbor gift idea?  This would also be a fun teacher gift if you're looking for ideas for that.

A year or two ago, I stumbled upon a candied almond recipe that sounded too tempting not to try.  And try I did.  With success!  It's so easy, but tastes very gourmet.

Let me tell you, if you make this (and you most definitely should), while the almonds are roasting in the oven, your kitchen will smell like Christmas at the mall!

So here's the recipe: (and don't complain to me when you gain 5 pounds in an hour because you just can't stop eating them!)


Candied Cinnamon & Sugar Almonds (makes 2 cups)
1 egg white
1 tsp cold water
1/2 tsp pure vanilla extract
2 cups unsalted whole almonds (I get the big bags at Costco)
1/2 C packed light brown sugar
1/4 tsp salt
1/2 tsp cinnamon
Preheat oven to 250 degrees. Line a large (11x17") rimmed baking sheet with foil and lightly spray with cooking spray.
In a large bowl, beat the egg white until stiff peaks form (about 4-5 minutes). Add the water and vanilla and beat again until stiff. Add the almonds to the mixture and stir gently to coat the almonds with the egg white mixture.
In a small bowl, mix the brown sugar, salt and cinnamon. Add this mixture to the almonds and stir gently to mix well.
Pour the almonds out onto the prepared baking sheet and carefully spread them out into a somewhat even layer. Place the baking sheet in the oven and bake for about an hour, stirring/flipping every 15 minutes, until the almonds look and feel dry.
To check to see if the almonds were done, I carefully picked one up in my fingers and when I pressed around it, I didn't get any wet sugar on my hands. The coating on the almonds felt hard and crunchy.
Cool completely before serving or packaging.
NOTE:  While these are super delicious the day you make them, they're even more delicious a day or two later, provided they last that long!

Now how about a card and cute packaging to go along with your delicious almonds?
The card started as a We R Memory Keepers stocking shape in the Silhouette store.  I copied and pasted the shape and made a card base out of it.  Then I cut the front out again using patterned papers from the Yuletide collection.  I embellished it with a crochet doily from the Yuletide line, Stickles, and a stamped label from Stampin' Up Itty Bitty Banners.


The packaging is just a leftover mini paint can that once housed some chipboard alphas.  I just decorated it using We R/Silhouette snowflake shapes and the Yuletide paper, plus some ribbon (you can see the lid a little better in the photo above).  I cut thin, thin strips of patterned paper, crumpled them up, and placed them in the bottom of the can. Then I placed a few of the almonds in a cellophane bag and tucked them safe and sound inside their pretty new home.


So there you have it.  A simple yet delicious gift and I tell you, if you give these this year, you'll be a favorite on everyone's list!
Check back tomorrow when I show some of the Christmas cards I've been working on lately.
Thanks for joining me at the Table today!


Saturday, November 10, 2012

Antique Chic Birthday planner

Hello!

Today, I'm sharing a birthday planner project I did not too long ago.  But first, I have to apologize.  I totally forgot to take pictures of the pockets and the monthly page.  Sorry!  But I'll include the PDF if you'd like to print it out.  And also another apology,  I was in a hurry when I took these photos, so they're really not very good, but it gives you an idea of the finished project.

I pulled out my We R Memory Keeper's binding tool, the Cinch II, for the first time and let me tell you, I was nervous.  Especially, since I was being adventurous and using balsa wood for the cover of this book.  But guess what?  It punched through SO smoothly!  I had already adhered that card stock strip at the edge too.  I'm excited to try other mini albums using the Cinch II!

Just a close- up photo of how I decorated the front. 

This next photo is so blurry!  Sorry!  But what I wanted to show is the tabs.  We R has a new Tab punch with clear plastic stickers that are the same shape as the punch.  All you do is punch your tab shape out of whatever paper you want, then put the tab shape on one side of the tab sticker.  Then you fold it over whatever you want to make a tabbed page.  Make sense?  


Each month is two pages, the left page is a pocketed page, which can hold a couple of cards, the right side has the lined form to write who's birthday occurs during that month.

Yesterday, I showed you two cards I had made to go with this book.  Here are the rest.  They use various We R patterned papers and card stocks, Sizzix dies, and Stampin' Up! card stock and stamps.  


Click here for the PDF of the birthday planner download.  Enjoy!

 This project was a lot of fun to make and forced me to stretch my creative muscles.

 Thanks for joining me at the Table today!


Friday, September 14, 2012

My Friend, the Teacher

Hello!

I thought I had posted this project awhile go, but I can't find it anywhere.  I guess that means I didn't.  I have a friend, who I used to work with.  We were both Para Educators (teacher's aides but more than that) with a group of wonderful women.  We all became very close.

My friend decided to become a teacher herself.  She went to school to get her degree while still working as a Para.  Well, this year, she got her first teaching job at the very same school where we all were once Paras!  I'm so proud of her.  I always loved watching her teach her little groups.  She was so good and I'm sure her new students love her.

This lady is a very no-nonsense person.  I mean she does super fun things with her students but she doesn't go for the frilly, fru-fru decorating that some teachers do.  So, I decided to make her something to hang in her classroom.  To add some homey-ness and to commemorate her first year as a full-fledged teacher.  But something that wasn't too over-the-top.

Here's what I came up with:


Simple but cute, I think.  I cut the apple with my Silhouette using the Hall Pass papers from We R Memory Keepers.  I also used my Silhouette and one of the sketch pens to "write" her name.  It was the first time I had used my sketch pens.  I picked a font that was a little "sketchy" to make it look more realistic.  It turned out exactly how I pictured it in my head.  I love when that happens!

Now I need to go visit her classroom.  I sure wish I could make myself tiny or invisible so I could sneak in and watch her at work. ;)

Thanks for joining me at the Table today!

Monday, September 10, 2012

Pinterest Party - a gift

Hello!

The kids are now back to school which means I'm back to work and back to trying to find a new routine.  And this little blog has taken a back seat to everything else.  Hopefully, I'll be able to get into the groove of things soon so I can blog more!

Today I wanted to show a project I made which was inspired by one of my Pins.

Here's the Pin:


Love this quote and love the colorful "awesome".  Here's what I came up with:


I made this for my friend who just got a job at my school.  Yay!  I designed the quote in my Silhouette software and sent it to my printer.  Her favorite color is purple, and it's hard to tell in this photo, but I painted the frame purple.  It looks super pretty in real life.  I'm glad she liked it. 

Thanks for joining me at the Table today!


Friday, October 14, 2011

Getting Crafty with Cookies!


Hello and happy Friday!

It's such a beautiful Autumn day where I live.  How's the weather in your neck of the woods?

I wanted to share a fun how-to video from Stampin' Up! featuring their new Cookie Press.  It looks SO fun.  This would be such a great project to do with your kids.  My kids think they're too big to bake with mom anymore but I may just have to purchase it to use with my future grandkids.  Yes, I like to plan ahead. ;)  Pair your cookie creations with a card, tag or SU! packaging and you have a fabulous Christmas gift for teachers, neighbors or anyone else!

Anyway, enjoy the video and if you'd like to purchase this or any other SU! product, simply visit my SU! website here:  http://www.stampinup.net/esuite/home/mykitchentablestudio/


Thanks for joining me at the Table today!

Saturday, August 6, 2011

Super Saturday

Hello!

I thought I would share with you all what I was up to today.  Once a year, the ladies at church get together and have a big craft day.  We call it Super Saturday!  We talk, laugh, eat and craft the day away.  I usually like to make a couple of extra projects to give my mom and sister for Christmas.  This year they were able to peruse the table of sample crafts so I asked them, which was their favorite {cause I'm sly like that}.  I picked the ones they pointed out.  I hope they like them!

For my mom

For my sister

For me to display during each birthday month of the members our little family :)

Thanks for joining me at the table today!

Wednesday, June 15, 2011

How Many Companies Does It Take To Make A Baby Gift?


Well, let's count them! (in no particular order)

1- Making Memories
2- Stampin' Up!
3- Ranger
4- Plaid
5- Provo Craft
6- We R Memory Keepers
7- My Mind's Eye
8- Darice
9- May Arts
10-Die-Namics
And a couple of others I can't remember :)


Thanks for joining me at the table today!

Thursday, January 6, 2011

I know Christmas is over but...


I meant to post this a little bit ago but got sick, then Christmas break was over and it was back to work for me.

A couple of years ago my good friend and fellow deal hunter called me to say she was at the dollar store and found a super steal: A package of 6 cooking utensils for a buck and should she pick up some for me. Uh, yes! In the package was 2 pancake turners, 2 cool wisks, and 2 ladel/strainers. I had planned on using them for neighbor gifts with a clever saying. But that year came and went and I was feeling uncreative so in their plastic packages they stayed. Well, since my husband's job is a little if-y right now and money is a little tight, I decided to pull them out and use them this year.

With the help of my same friend, who is so creative, she helped me come up with a cute and saying to go with them.

I just printed the saying on my computer, cut it into a tag shape and used my scraps to decorate. The little poinsettia embellishment was just made with a small flower punch I've had for years. I punched 2 flowers, adhered them together and stuck a little Stampin' Up! rhinestone gem in the middle. I love those SU! rhinestones. They are the best I've ever used.

And you know what? I got more wow's from my neighbors about these gifts than when I did the "cookie mix in a jar" gift two years ago! Just don't tell them I only spent 20 cents for each of their gifts this year. ;)